Step-by-step Workflow Guide
Start
After you installed and enabled the IPFS plugin, the Chunker Manifest Manager button will appear next to the Play button.

Click on this button to open the Chunker Manifest Manager window.
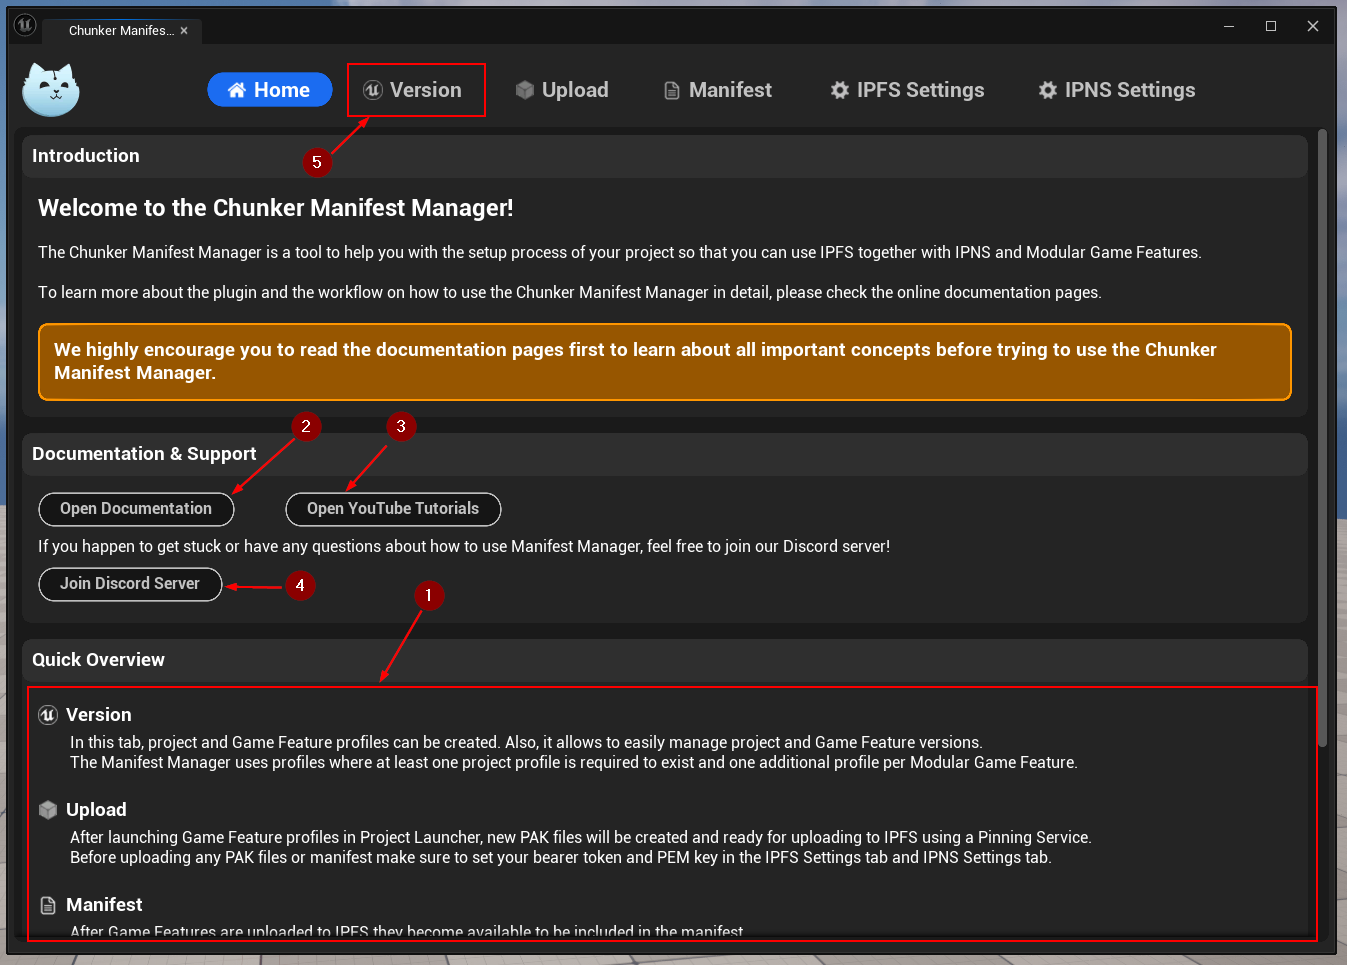
You will be greeted with the Home tab which gives you an overview about your
options on each tab 1 as well as a convenient way to access the
plugin's Documentation 2 and
YouTube Tutorials 3.
If you have questions and need support, please join our
Discord Server 4.
In order to start using Chunker Manifest Manager, click on the Version
tab 5.
Step 1: Prepare your Game Project
This workflow makes use of Unreal Engine's built-in Project Launcher and its profiles. The Chunker Manifest Manager will help you in creating and setting up those profiles correctly.
Create Project Profile
First, create a Project Profile by clicking Create in the Project section.

Usually, you will see the message Missing cooked maps after creating a new
Project Profile which is expected.

Resolve "Missing cooked maps"
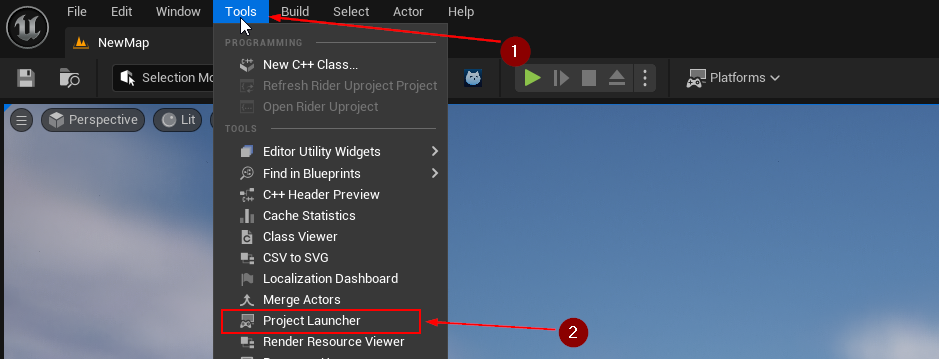
In order to resolve this configuration issue, go to the
Tools 1 menu in the Unreal Engine editor window and select
Project Launcher 2.
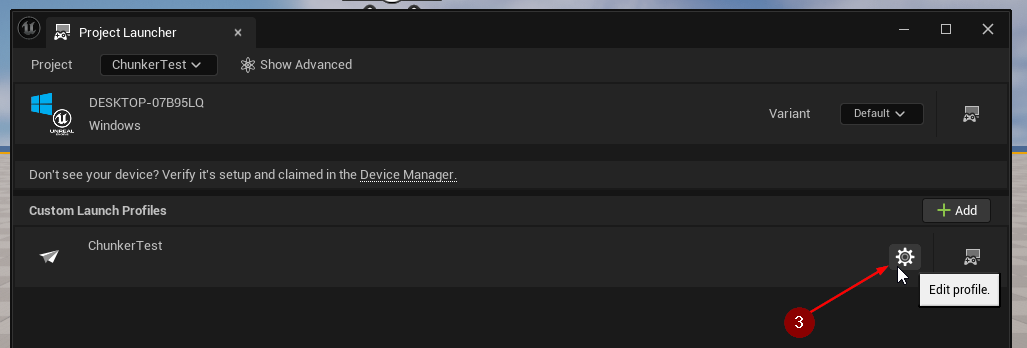
In the Project Launcher window, you will find a section labeled Custom Launch Profiles. All your existing project and Game Feature profiles will be displayed here. For now, you should only see one profile which is the Project Profile named after your game project.
Click on the gear 3 button next to your Project Profile to edit it.
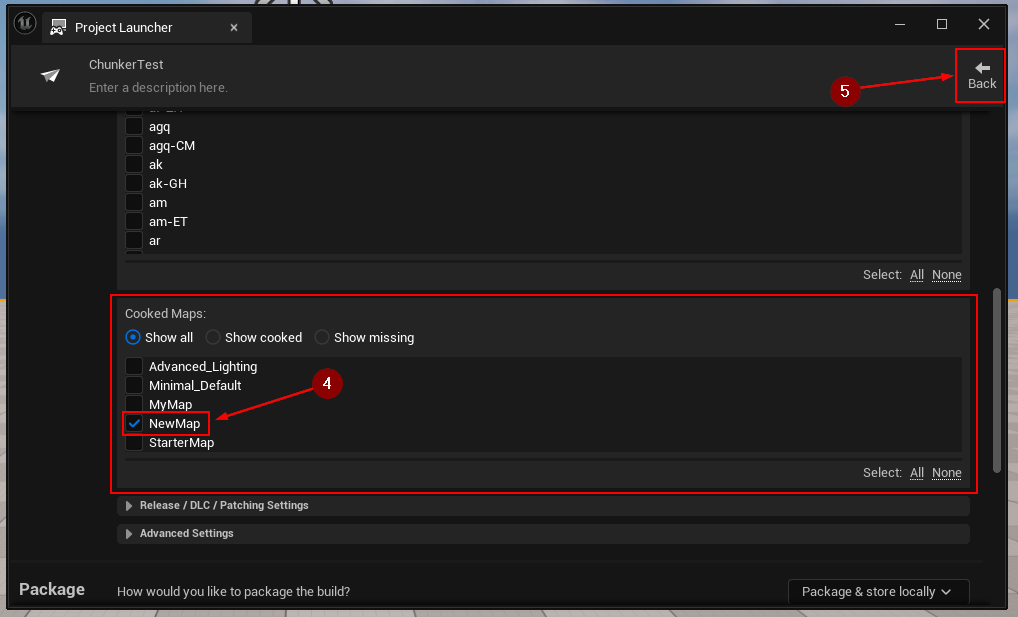
Next, scroll down within this Project Profile until you find a section labeled
Cooked Maps.
Make sure there is at least one map of your project selected 4 that will be cooked with the project later.
Then, click on the Back 5 button to save your changes and close
the Project Launcher window.
When switching back to the Chunker Manifest Manager window you may still see
the message about missing cooked maps. Click the Revalidate 6
button to let Chunker Manifest Manager check again for any configuration
issues.

The error message should have disappeared now after revalidating.
Resolve "No Game Features available"
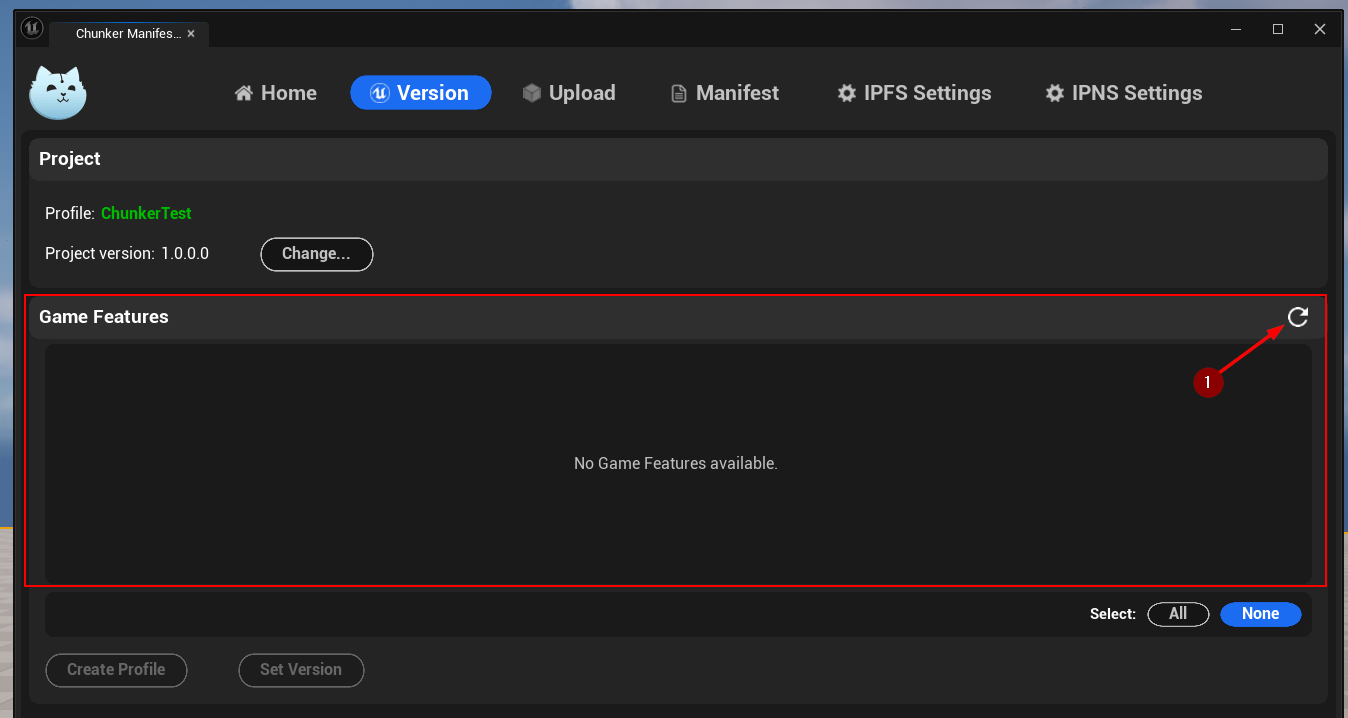
In case you do not have any Game Features in your project yet, you will see
the message No Game Features available in the Game Features section.
You can use the button 1 in the top right corner to refresh this list.
If your project already uses Game Features, you can skip this section and continue with Step 2.
To make use of Chunker Manifest Manager, you need to have at least one Game Feature in your game project and at least one of them needs to be enabled.
Follow the official documentation to create at least one Game Feature.
If you still see this message after opening the Version tab, make sure your
Game Features are enabled.
Open Edit 1 menu, then click Plugins 2.
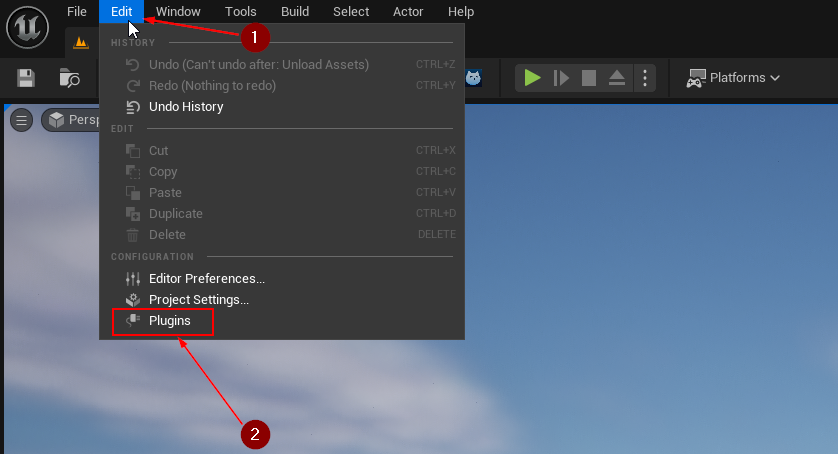
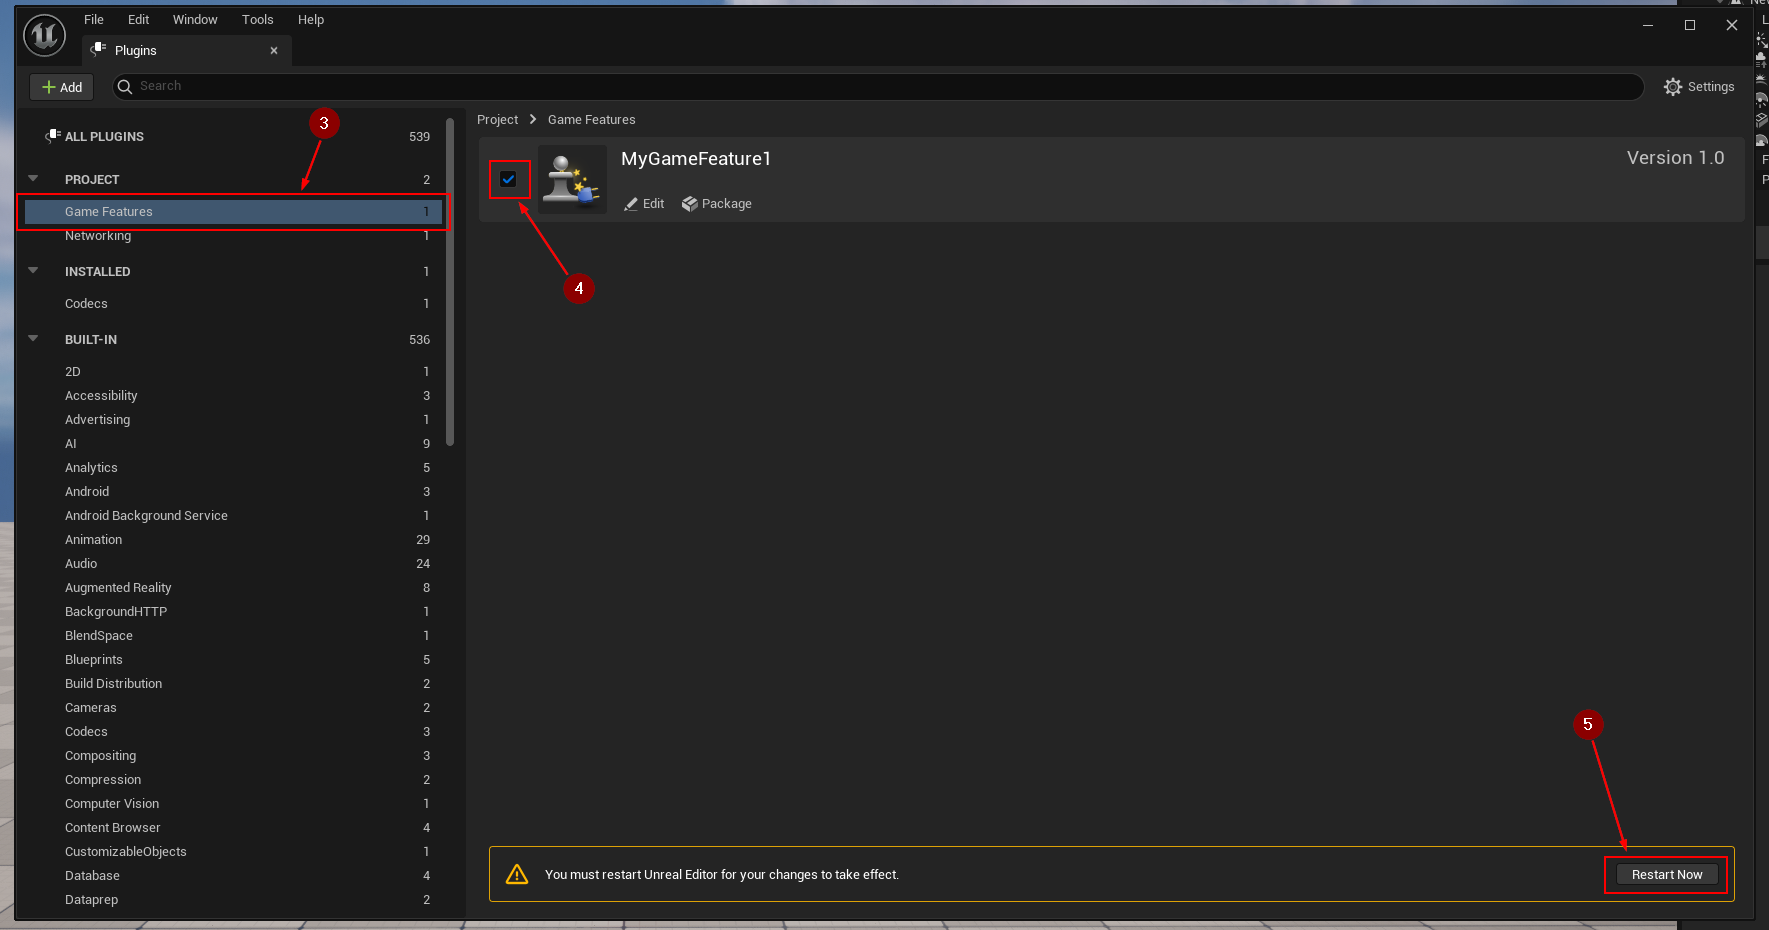
This will open the Plugins window. On the left hand side, select the
Game Features 3 category and make sure the
checkbox 4 next to your Game Feature(s) are enabled. You may
need to restart the editor 5 afterward.
Step 2: Prepare your Game Features
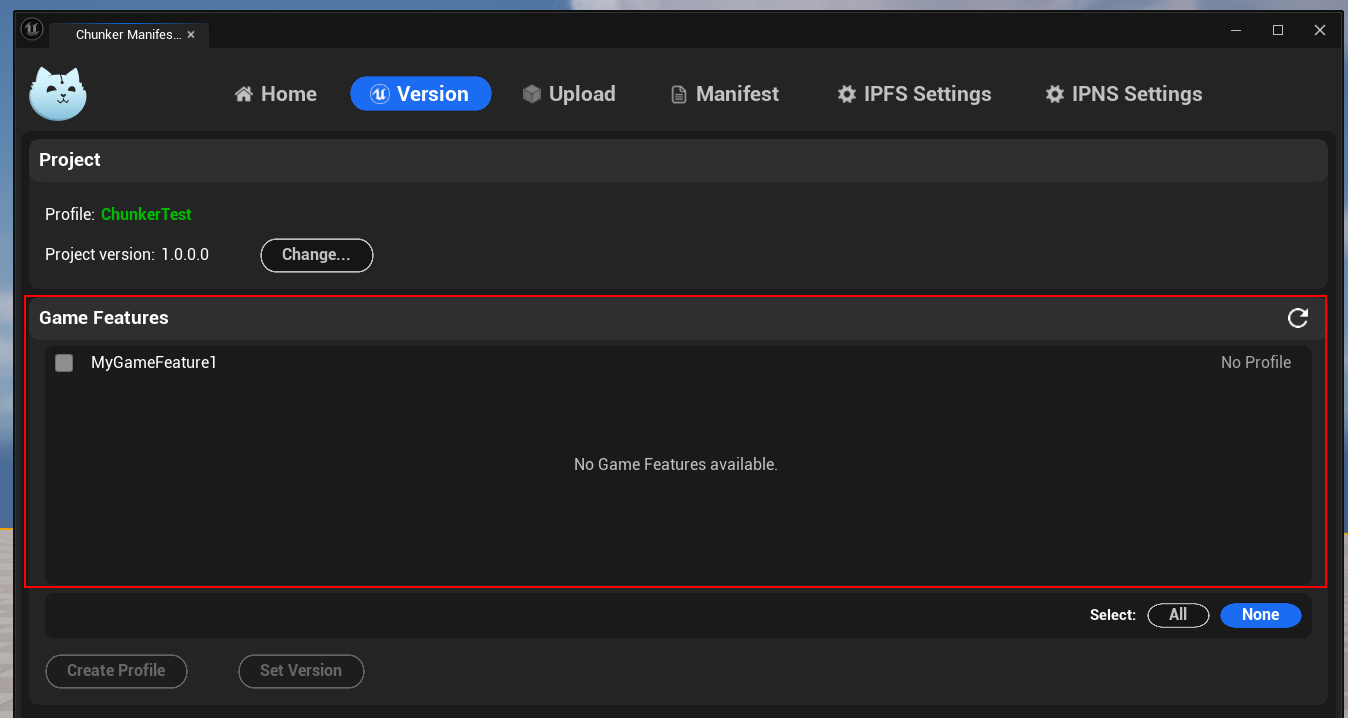
In the Version tab of Chunker Manifest Manager, you should see a list of
available Game Features.
Create Game Feature Profiles
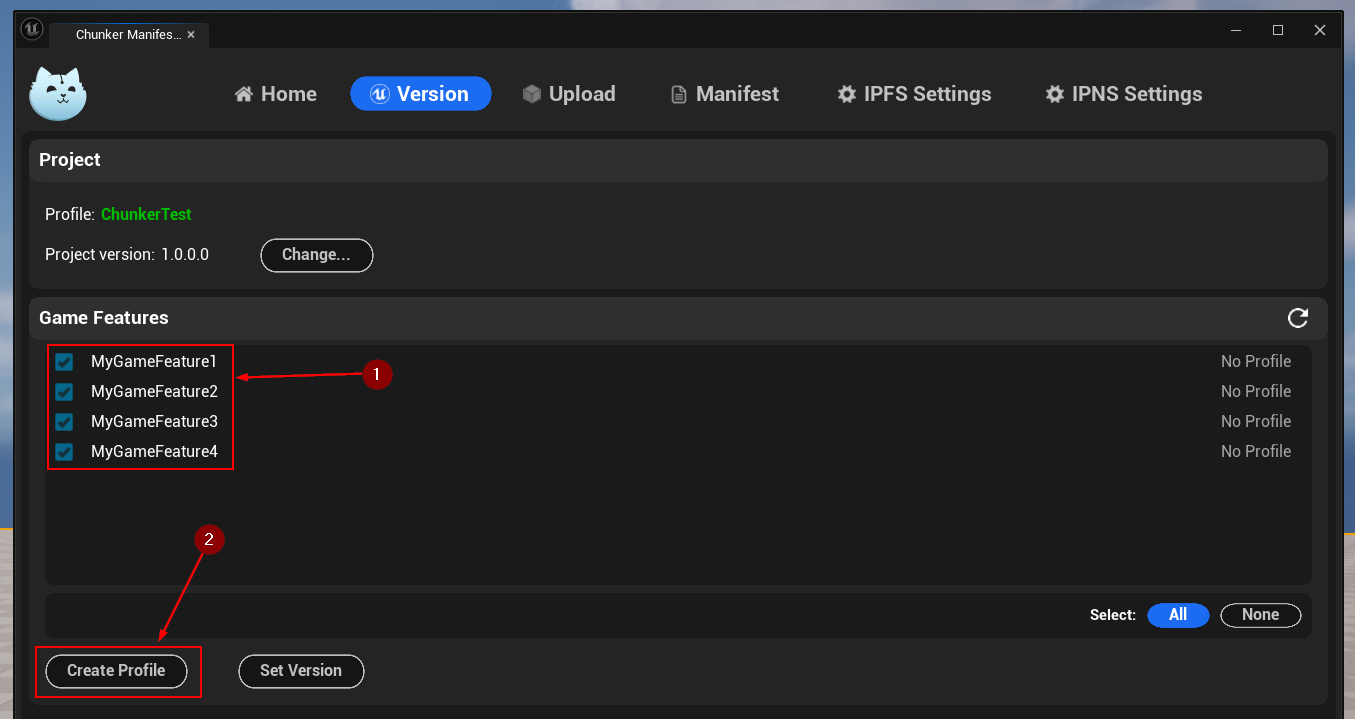
Now it's time to create profiles for your Game Features. Select one or more
Game Features 1 and click on the
Create Profile 2 button.
Step 3: Create .pak files from Game Features
In order to create .pak files that can be uploaded later, each Game Feature
needs to be built by using the corresponding Project Launcher profiles.
In the Unreal Engine editor window, go to Tools 1 menu and
select Project Launcher 2.

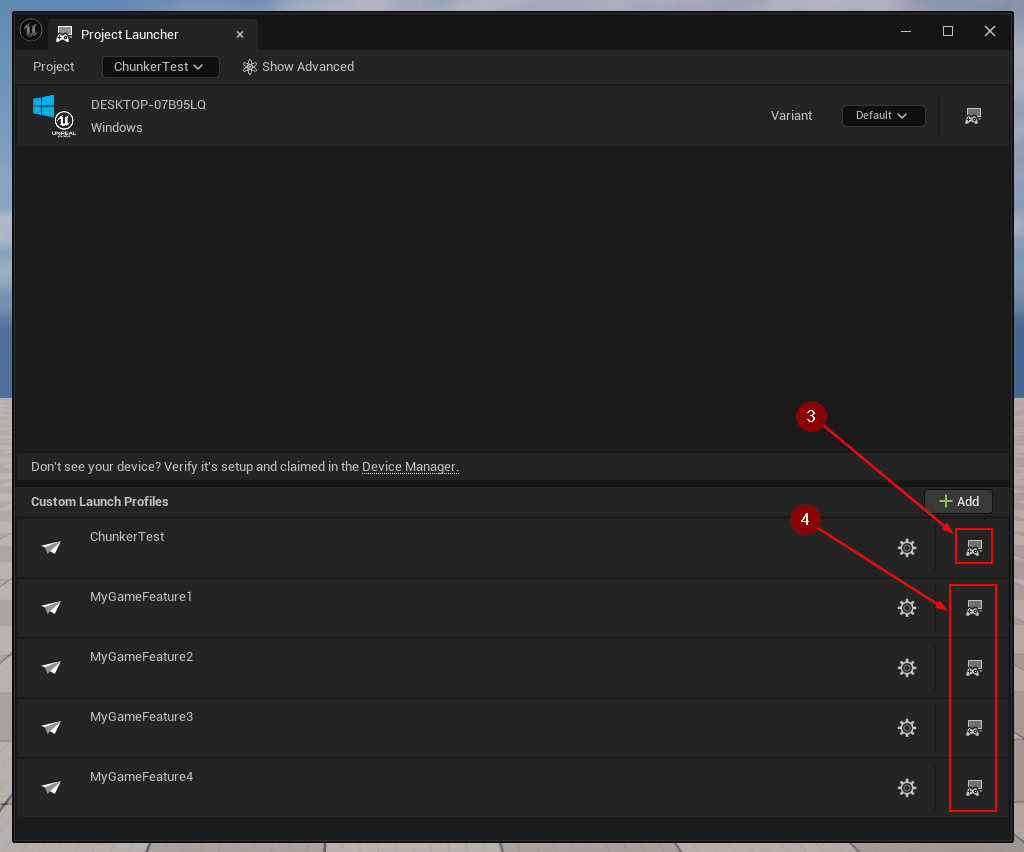
In the Project Launcher window you will see a list of all your project and Game Features profiles that you just created.
Before you can build any of your Game Features you need to build your Game Project first.
Find your Project Profile and click on its Launch 3 button.
After this process has finished, continue with building your Game Features.
To do so, find the Game Features that you want to build and click on their
Launch 4 buttons, one after another.
At this point, you should find one created .pak file per Game Feature.
Starting from the root directory of your Unreal project, the path to each .pak
file can be found as follows:
./PROJECT_NAME/Plugins/GameFeatures/GAME_FEATURE_NAME/Saved/StagedBuilds/TARGET_PLATFORM/PROJECT_NAME/Plugins/GameFeatures/GAME_FEATURE_NAME/Content/Paks/TARGET_PLATFORM
Copy or move .pak files of your Game Features into one directory, so that
all of them can easily be selected at once for uploading later.
Step 4: Upload Game Features to IPFS
IPFS Settings
In order to upload Game Features to IPFS, you need to choose a
Pinning Service and add your credentials for it in the
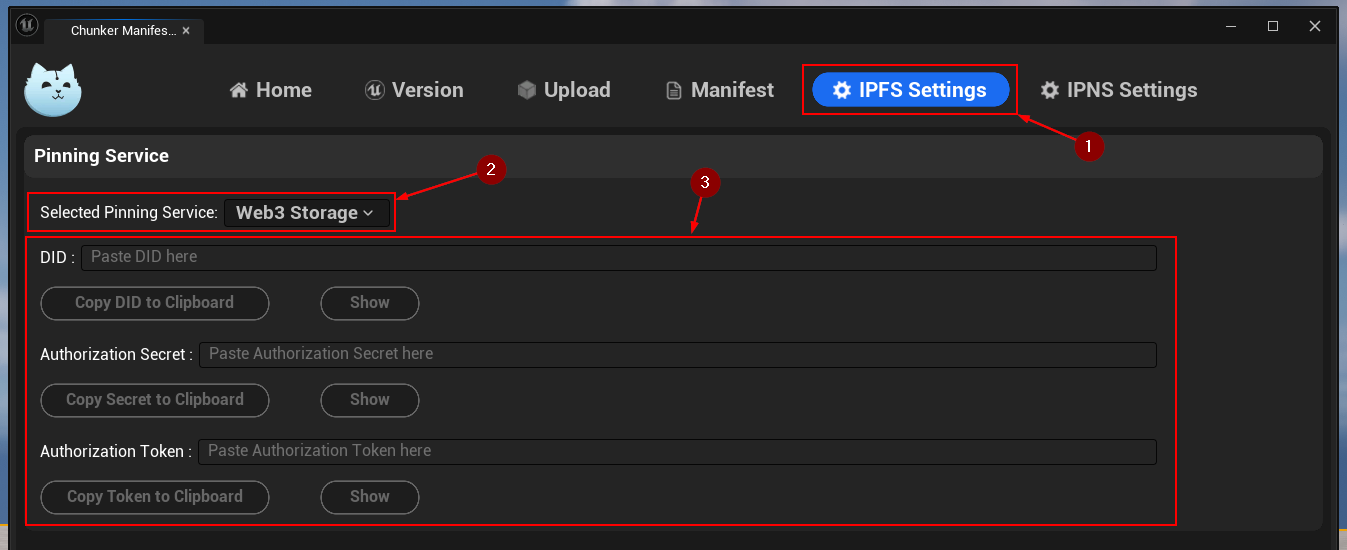
IPFS Settings 1 tab.
First, select the Pinning Service 2 you would like to use. Depending on the selected service, the inputs below for the required credentials may change.
In this example, we chose Web3.Storage as our Pinning Service and have to provide a DID, Authorization Secret, and Authorization Token 3.
Credentials are saved per Pinning Service so that switching between them is quick and easy.
Upload
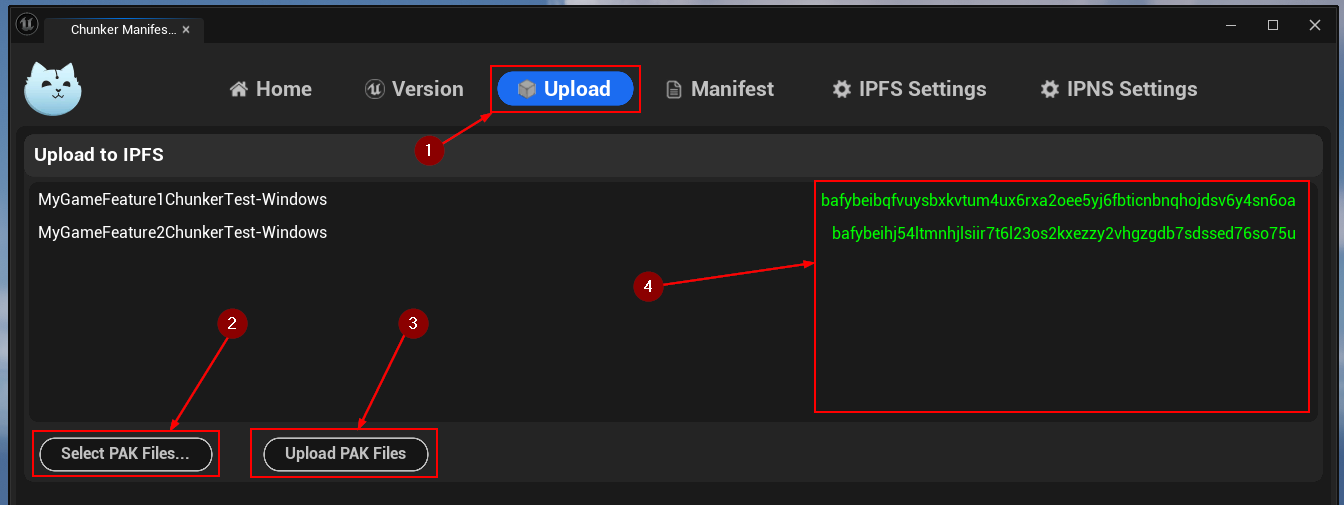
Now, open then Upload 1 tab. This is where you can select
your .pak files for uploading to IPFS. Click on the
Select PAK Files... 2 button to open the file dialog and select
the .pak files you want to upload to IPFS.
The list labeled as Upload to IPFS should now be populated with the .pak
files you selected and be ready for upload. To start uploading, click the
Upload PAK Files 3 button. This process might take a while to
finish, depending on the amount of files, their size, and your internet speed.
After the upload has finished, you should see a CID 4 being
displayed next to each .pak file. You can copy those CIDs directly from the
Upload tab here. Also, the full list of file names and CIDs is printed to
the Output Log in the Unreal Engine editor.
Uploaded .pak files and their corresponding CIDs can always be found later
using the Pinning Service's dashboard on their website.
Step 5: Construct Game Manifest and Upload to IPNS
In order to create or update an IPNS Name, a PEM Key is required. It is used for authorization so that only you as the owner of a specific IPNS Name can control its contents.
IPNS Settings
Navigate to the IPNS Settings 1 tab.
If you already have a PEM Key, simply click on the
Browse... 2 button and select your file to use it.
In the case that you do not have a PEM Key yet, click on the
Generate PEM Key... 3 button to generate a new one.
Alternatively, you can import an existing PEM Key from text by clicking the
Import PEM Key from Text... 4 button. It will open a dialog
where you can paste the text to import your key.
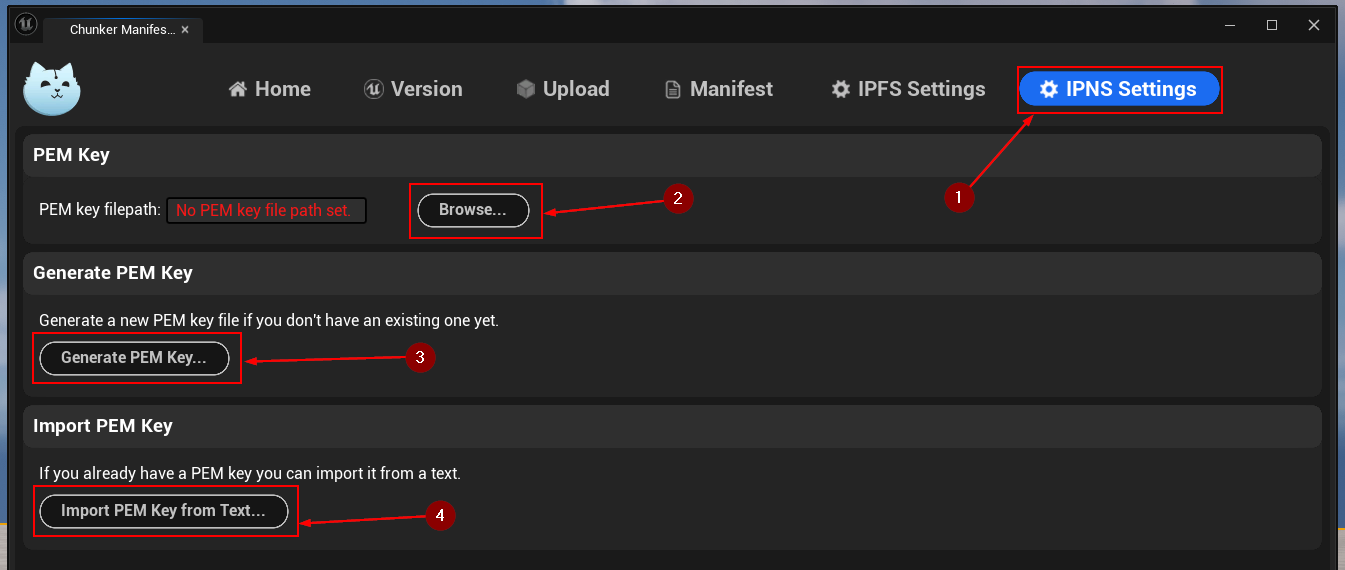
Your PEM Key should now be set up and ready for use.
Make sure to store your PEM Key in a safe location. If you lose it, you will not be able to update the corresponding IPNS Name again.
Construct and Upload
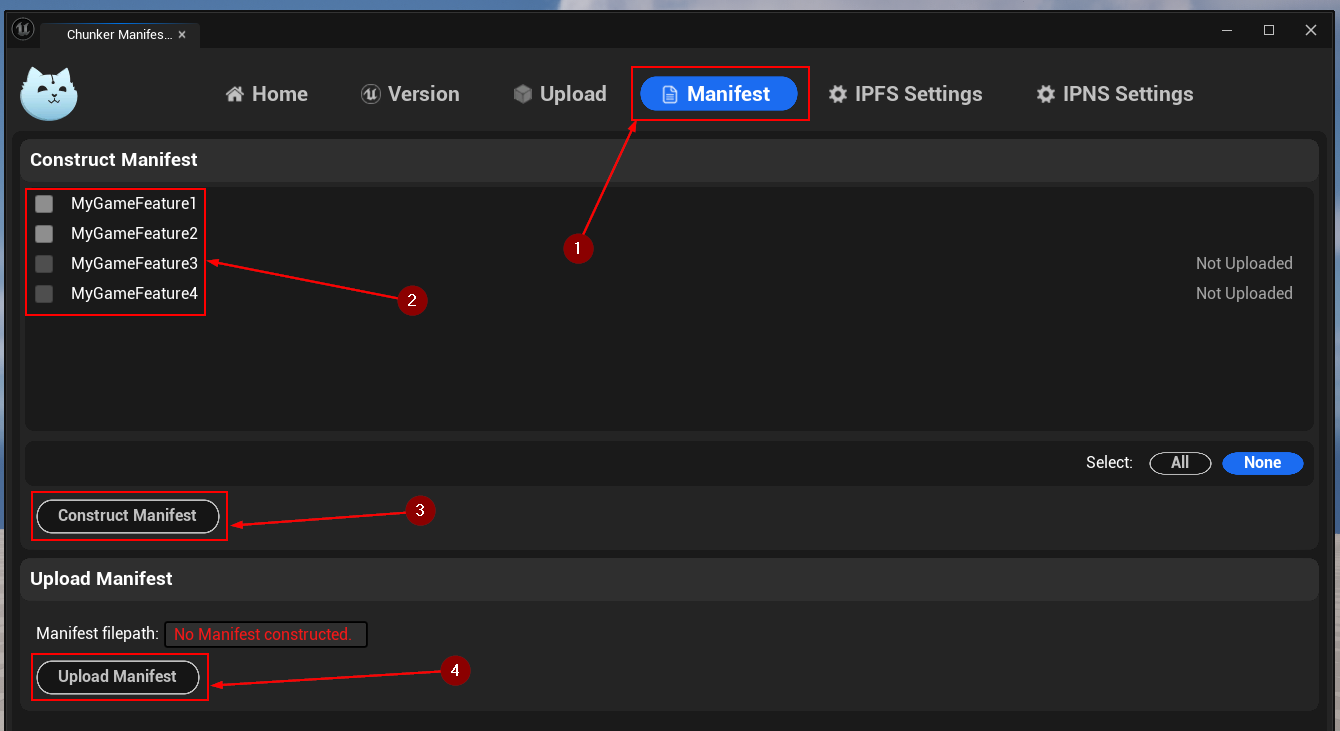
Navigate to the Manifest 1 tab. There you will see a list of
all your Game Features in the project.
Select the Game Features 2 that you would like to include in
the Game Manifest and click on the 3 Construct Manifest
button.
This will create a file called GameManifest.json at
./PROJECT_NAME/Saved/IPFS-Developer/.
The direcotry name can be changed in the Project Settings under
3Studio | IPFS (User Settings), then find the setting under
Developer | IPFS Developer Directory.
After the Game Manifest is constructed, click on the 4
Upload Manifest button to upload it to IPNS.
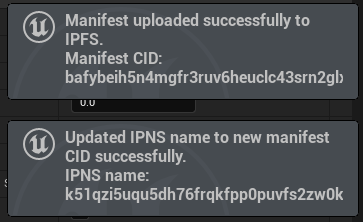
This will first upload the Game Manifest file to IPFS. After that, your IPNS Name will be created/updated to now point to the CID of the Game Manifest that was uploaded just a moment before.
The Game Manifest's CID and IPNS Name will both appear as notifications on
the screen and in the Unreal Engine editor's Output Log.

Step 6: Project update pipeline
Although it is possible to use Manifest Manager's functionality in many different ways, this tool was built with a specific game update pipeline in mind.
By following this pipeline you ensure to benefit the most when using this tool.
Versioning
After you made new changes to your project and/or Game Features, you will want to release an update on IPFS. Your first step should be to update the Project Version.
Even if changes were only made in a single Game Feature, it should still be represented in your Project Version. In case changes were made in one or more Game Features, set their version to the new Project Version.
Do not apply the new version to Game Features that were not updated.
It is crucial to update the Project Version even if only a single game feature has been modified as this ensures consistency and clarity in the development process.
By using this method you ensure a clear overview of timeline when each of the Game Features were updated.